Creating a professional email address for your Shopify store is crucial for maintaining a professional appearance and ensuring smooth communication with your customers. In this guide, I’ll walk you through the steps to set up a custom domain email address for your Shopify store.
Table of Contents
- Step 1: Specify Your Email Address in Shopify
- Step 2: Create Your Email with Your Email Host
- Step 3: Update Your Email in Shopify
- Step 4: Authenticate Your Domain
- Step 5: Add DNS Records to Your Email Host
- Step 6: Validate DNS Records with Shopify
- Step 7: Add SPF Record to Prevent Spam Issues
- Conclusion
Step 1: Check Email Addresses in Shopify
First, you need to specify the email address you want to use in Shopify. Navigate to your Shopify store settings. On the right side, you’ll see your contact information, including your phone number and email addresses.

The first email is the one you signed up with, which Shopify uses to contact you. The second email is the sender email that your customers see when you email them. This is the email address we need to change.
Step 2: Create Your Email with Your Domain Host
Next, you need to create the email address you want to use. For this tutorial, I’m using cPanel with my hosting account, but the steps are similar for other services. Navigate to your email hosting service and create a new email account.

Ensure you choose the correct domain if you have multiple domains. Create your new email address and save the changes.
Step 3: Update Your Email in Shopify
Now that you have created your new email address, go back to your Shopify store settings and update the sender email with the new email address you just created. Save the changes.

Once you save the changes, Shopify will prompt you to authenticate the new email address to ensure it’s properly set up.
Step 4: Authenticate Your Domain
To authenticate your domain, click on the “Fix this” button in Shopify. This will open a page with the necessary DNS records you need to add to your domain host.

These records are essential for verifying that you own the domain and for ensuring that your emails are delivered from your custom email address rather than a generic Shopify email address.
Step 5: Add DNS Records to Your Email Host
Go to your domain host’s DNS settings, usually found in the cPanel under “Zone Editor” or a similar name. Add the provided DNS records one by one. These records typically include CNAME records and TXT records.

Ensure you copy each record correctly to avoid any errors. After adding all the records, save the changes.
Step 6: Validate DNS Records with Shopify
Once you have added the DNS records, go back to Shopify and click on the “Authenticate Domain” button. Shopify will check the DNS records to ensure they are correctly set up. This process can take up to 24 hours.

Once validated, your domain status will change to authenticated, indicating that your custom email address is now set up correctly.
Step 7: Add SPF Record to Prevent Spam Issues
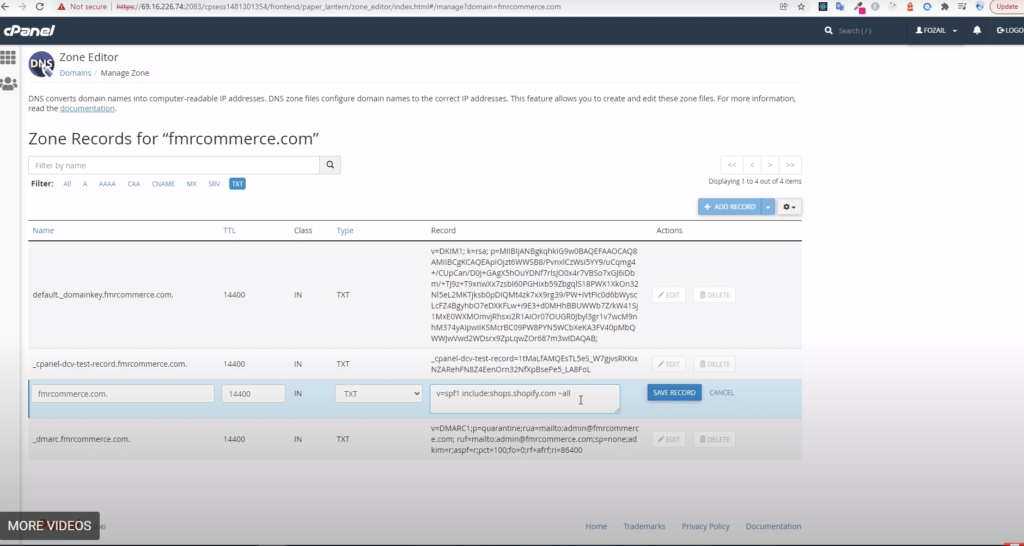
To prevent your emails from being marked as spam, you need to add an SPF record to your DNS settings. An SPF record specifies which mail servers are allowed to send emails on behalf of your domain.

Navigate back to your DNS settings and look for an existing TXT record with a value starting with “v=spf1”. If it exists, add “include:shops.shopify.com” to it. If it doesn’t exist, create a new TXT record with this value.
Conclusion
By following these steps, you can create a professional email address for your Shopify store, ensuring that your communications appear professional and trustworthy. This setup not only enhances your store’s credibility but also helps in maintaining smooth communication with your customers.
Remember, the keyphrase “Create Email Address for Shopify Store” should be kept in mind throughout the process to ensure that you are setting up the email correctly and efficiently.
Thank you for following this guide. If you encounter any issues, don’t hesitate to reach out for further assistance.
